Table of Contents
- A first Hibernate example
- Introduction
- Creating Java Project and classes
- Hibernate configuration
- Annotation or XML
- Mapping
- Create a session factory
- Configuring Log4J
- Create database and tables
- Create a test client
- Using MyEclipse for Hibernate projects
- Adding libraries and Hibernate capabilities
- Generate Hibernate mappings from existing db
- Hibernate basics
Hibernate is a solution for object relational mapping and a persistence management solution or persistence layer. This is probably not understandable for anybody learning Hibernate.
What you can imagine is probably that you have your application with some functions (business logic) and you want to save data in a database. Using Java, the business logic normally works with objects of different class types. Your application is object-oriented. Your database tables are not object oriented but relational.
The basic idea of object relation mapping - ORM is to map database tables to a class. One row of the database data is copied to a class instance. On the other hand, if an object is saved, one row is inserted in the database table.
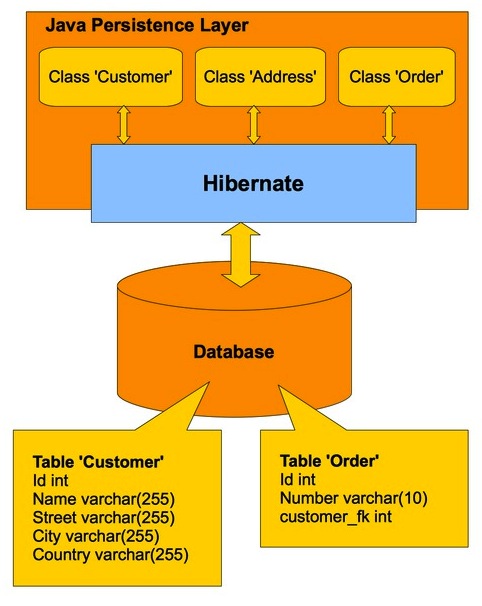
Saving data to a storage is called persistence. The process of copying of table rows to objects and vice versa is called object relational mapping.
As it is easier to explain something after having shown a real example, we will develop our first Hibernate application now.
Our use case is sweet. We will use an example from the honey production. You need a lot of bees to get honey. Our use case includes Honey and Bee as model and a 1:n relation from Bee to Honey. Using object oriented terms: There is a 1:n association between the class Bee and Honey.
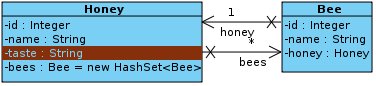
We will create a class Honey which is mapped to the table honey in the database and a class Bee mapped to the table bee. The following picture shows our database schema.

In order to get complete our application, we must undertake the following steps:
- create classes
- create mapping from classes to tables
- configure Hibernate libraries
- configure the Hibernate datasource
- write code to use our mapped classes
Source code
For this example you will find the complete source code in the ebook. Normally, I show only the relevant part of the source code in the ebook. But you can find the complete source code in the provided sources.
Create a new project using your development environment. I used Eclipse for this example. Using Eclipse press the keys Ctrl+n (Strg+n) to create a new project. Select Java project. We will call it FirstHibernateExample.
Create a new class named Honey in the package de.laliluna.example. Our class has four fields:
- Integer id – an Integer value as primary key
- String name – name of the honey
- String taste – description of the taste
- java.util.Set<Bee> bees – bees, having produced the honey
Furthermore we need:
- Getter and setter methods for our fields. In eclipse you can generate them (Context menu → Source → Generate Getter and Setter).
- A default constructor
- Implementation of the Serializable interface
- Overwrite the toString method. We will need it for debugging.
Java version: I used Java generics, which was introduced with Version 5 (alias 1.5).
Annotations always starts with @.
Your source code should look like the code below:
Honey class.
package de.laliluna.example;

import java.io.Serializable;
import java.util.HashSet;
import java.util.Set;

public class Honey implements Serializable {

   private Integer id;
   private String name;
   private String taste;
   private Set<Bee> bees = new HashSet<Bee>();

   public Honey() {
   }
   public Honey(String name, String taste) {
      this.name = name;
      this.taste = taste;
   }
   public Integer getId() {
      return id;
   }
   public void setId(Integer id) {
      this.id = id;
   }
   public String getName() {
      return name;
   }
   public void setName(String name) {
      this.name = name;
   }
   public String getTaste() {
      return taste;
   }
   public void setTaste(String taste) {
      this.taste = taste;
   }
   public Set<Bee> getBees() {
      return bees;
   }
   public void setBees(Set<Bee> bees) {
      this.bees = bees;
   }
   public String toString() {
      return "Honey: " + getId() + " Name: " + getName() + " Taste: "
            + getTaste();
   }
}
Requirements of domain classes
There are a couple of requirements for a mapped class, you should always consider to meet:
- An id property
- A default constructor (= no parameter) with at least protected scope. Either omit the constructor or create an empty one.
- Implementation of the Serializable interface, if and only if you want to serialize your entity. This may happen indirectly if you put an entity for example into a HTTPSession. Hibernate does not require the Serializable interface in entities.
- A useful toString method for debugging. (recommendation)
Create a class Bee with the fields:
- Integer id
- String name
- Honey honey
The field id is once again the primary key. Please don’t forget the important requirements, I stated above.
Bee class.
package de.laliluna.example;

import java.io.Serializable;
import java.text.MessageFormat;

public class Bee implements Serializable {

   private Integer id;
   private String name;
   private Honey honey;

   public Bee() {
   }
   public Bee(String name) {
      this.name = name;
   }
   public Integer getId() {
      return id;
   }
   public void setId(Integer id) {
      this.id = id;
   }
   public String getName() {
      return name;
   }
   public void setName(String name) {
      this.name = name;
   }
   public Honey getHoney() {
      return honey;
   }
   public void setHoney(Honey honey) {
      this.honey = honey;
   }
   public String toString() {
      return MessageFormat.format("{0}: id={1}, name={2}", new Object[] {
            getClass().getSimpleName(), id, name });
   }
}
The Hibernate configuration will define
- which database we connect to
- the type of database (MySQL, PostgreSQL, Oracle, …)
- Hibernate configuration settings
- classes or XML mapping files holding our mappings.
Create a new file named hibernate.cfg.xml in your src directory.
You have to choices to map documents: Annotations and XML. They’ll be discussed later in this book. I explain both approaches for this example.
If you can use Java 1.5 alias 5 or later, I recommend to use annotations.
Below you can find a configuration for PostgreSQL using annotation based mapping. Afterwards, I will explain required changes for other databases and XML based mapping. Do not forget to change the username and the password to suit your database configuration.
hibernate.cfg.xml.
<?xml version='1.0' encoding='UTF-8'?>
<!DOCTYPE hibernate-configuration PUBLIC
     "-//Hibernate/Hibernate Configuration DTD 3.0//EN"
     "http://hibernate.sourceforge.net/hibernate-configuration-3.0.dtd">
<hibernate-configuration>
   <session-factory>
      <!--  postgre SQL configuration-->
      <property name="connection.url">
         jdbc:postgresql://localhost:5432/learninghibernate
      </property>
      <property name="connection.username">postgres</property>
      <property name="connection.password">p</property>
      <property name="connection.driver_class">
         org.postgresql.Driver
      </property>
      <property name="dialect">
         org.hibernate.dialect.PostgreSQLDialect
      </property>
      <property name="cache.provider_class">
         org.hibernate.cache.NoCacheProvider
      </property>
      <property name="current_session_context_class">thread</property>
      <property name="hibernate.show_sql">true</property>
      <property name="hibernate.hbm2ddl.auto">create</property>
      <mapping class="de.laliluna.example.Honey" />
      <mapping class="de.laliluna.example.Bee" />
   </session-factory>
</hibernate-configuration>
At the beginning of the configuration, you can find the database connection. Afterwards, the dialect is specified. Hibernate will translate all queries into this dialect. Then, I configured the cache implementation and the session and transaction behaviour. The setting hbm2ddl.auto instructs Hibernate to update or create the table schema when the configuration is initialized. You only have to create the database.
The tag <mapping class> at the end of the file defines which classes are mapped using annotations. If you want to use XML based mappings then you need to reference the XML mapping files instead:
<mapping resource="de/laliluna/example/Honey.hbm.xml" />
<mapping resource="de/laliluna/example/Bee.hbm.xml" />
A configuration for MySQL requires the following changes:
<property name="connection.url">jdbc:mysql://localhost/learninghibernate</property>
<property name="connection.username">root</property>
<property name="connection.password">r</property>
<property name="connection.driver_class">com.mysql.jdbc.Driver</property>
<property name="dialect">org.hibernate.dialect.MySQLDialect</property>
If you want to use another database, you must find out the name of the driver class and the name of the dialect. You can find all available dialects in the java package org.hibernate.dialect of the hibernate.jar file.
A short extract of frequently used dialects:
The connection.url is a normal JDBC connection URL.
With the mapping we define in which table column a field of a class is saved. As already stated, we have two options for the mapping. The first one is based on annotation, it is new and the future and I recommend to use it. But it requires Java 5. The second one is based on XML mapping files. I will explain both:
An annotation always starts with an @. You just have to add annotations to your java file. Annotations must be imported just like other classes.
Honey class with annotations.
.....
import javax.persistence.Entity;
import javax.persistence.GeneratedValue;
import javax.persistence.GenerationType;
import javax.persistence.Id;
import javax.persistence.OneToMany;
import javax.persistence.SequenceGenerator;
@Entity
@SequenceGenerator(name = "honey_seq", sequenceName = "honey_id_seq")
public class Honey implements Serializable {
   @Id
   @GeneratedValue(strategy=GenerationType.SEQUENCE, generator="honey_seq")
   private Integer id;
   private String name;
   private String taste;
   @OneToMany(mappedBy="honey")
   private Set<Bee> bees = new HashSet<Bee>();
The annotation @Entity defines that our class is a mapped class. The primary key is defined by the @Id annotations. It is generated by Hibernate using a database sequence. It is defined with @SequenceGenerator before it is used by the id (@GeneratedValue).
The annotation @OneToMany describes that the field bees is a 1:n association to the class Bee. The foreign key is defined in the class Bee. Therefore, we have to add the parameter mappedBy.
The class Bee uses two other annotations. @ManyToOne describes the association/relation from class Bee to Honey. With the annotation @JoinColumn we configure that the table bee contains a foreign key column. We did not specify a column name, so Hibernate will choose honey_id.
Bee class with annotations.
.......
import javax.persistence.Entity;
import javax.persistence.GeneratedValue;
import javax.persistence.GenerationType;
import javax.persistence.Id;
import javax.persistence.JoinColumn;
import javax.persistence.ManyToOne;
import javax.persistence.SequenceGenerator;

@Entity
public class Bee implements Serializable {
   @Id
   @GeneratedValue(strategy = GenerationType.SEQUENCE, generator = "bee_gen")
   @SequenceGenerator(name = "bee_gen", sequenceName = "bee_id_seq")
   private Integer id;
   private String name;

   @ManyToOne
   @JoinColumn
   private Honey honey;
If your database does not support sequences, you might try
   @Id
   @GeneratedValue(strategy=GenerationType.AUTO)
   private Integer id;
This selects a generator depending on the configured database dialect.
You only need the XML mapping files, if you don’t use annotations.
In the mapping file the mapping from our class Honey to the database table honey is configured. Create a file Honey.hbm.xml in the package de.laliluna.example.
Honey.hbm.xml.
<?xml version="1.0" encoding="UTF-8"?>
<!DOCTYPE hibernate-mapping PUBLIC "-//Hibernate/Hibernate Mapping DTD 3.0//EN"
 "http://hibernate.sourceforge.net/hibernate-mapping-3.0.dtd" >
<hibernate-mapping package="de.laliluna.example">
  <class name="Honey" table="thoney" >
      <id name="id" column="id">
      <generator class="sequence">
            <param name="sequence">honey_id_seq</param>
         </generator>
      </id>
      <property name="name" column="name" type="string" />
      <property name="taste" column="taste" type="string" />
      <set name="bees" inverse="true">
        <key column="honey_id"></key>
       <one-to-many class="Honey" />
      </set>
   </class>
</hibernate-mapping>
The tag <id> specifies the primary key and how it is generated. Normal fields are mapped to a column using the <property> tag. If we didn’t specify a column name (column=”xyz”), than Hibernate would have chosen the name of the field as default column name.
<set> describes the relation to the class Bee.
Our example used a sequence to generate the id. If your database does not support sequences, you might try
<generator class="native"/>
This will choose a generator depending on your database dialect.
Why using type=”string” and not type=”java.lang.String”?
The Hibernate type can be more precise than the java types. A database field like date, timestamp, time is always handled by a java.util.Date. When you define a type as java.util.Date Hibernate does not know which kind of database type to choose when it generates tables. This is why I use Hibernate types in general.
In most cases you don’t need to set the type. Hibernate will guess the column type from the Java class.
To use Hibernate, we need a couple of libraries, alias JAR files.
Maven Setup
In the sample projects, I have used Maven dependencies. If you know Maven, just copy the POM from the source code and use it. I have declared all dependencies in a parent pom.xml, which is in the root of the workspace.
Just switch into the FirstHibernateAnnotation directory and input
mvn dependency:resolve
in a shell. Alternatively, you can choose a run task from within Eclipse as well by right-clicking on a pom.xml and choosing "Run…"
Non Maven Setup
If you want to add the libraries manually, here is a list of required libraries and versions.
In Eclipse Open your project properties, select “Java Build Path”, click on “Add External Jars” and add at least the libraries shown below to your project path.
Included in the Hibernate Core Download.
+- junit:junit:jar:4.5:test
+- org.slf4j:slf4j-log4j12:jar:1.6.0:compile
|  +- org.slf4j:slf4j-api:jar:1.6.0:compile
|  \- log4j:log4j:jar:1.2.14:compile
+- c3p0:c3p0:jar:0.9.1.2:compile
+- org.hibernate:hibernate-core:jar:3.6.4.Final:compile
|  +- antlr:antlr:jar:2.7.6:compile
|  +- commons-collections:commons-collections:jar:3.1:compile
|  +- dom4j:dom4j:jar:1.6.1:compile
|  +- org.hibernate:hibernate-commons-annotations:jar:3.2.0.Final:compile
|  +- org.hibernate.javax.persistence:hibernate-jpa-2.0-api:jar:1.0.0.Final:compile
|  \- javax.transaction:jta:jar:1.1:compile
+- javassist:javassist:jar:3.9.0.GA:compile
Some projects use caching and Hibernate validation.
Included in Hibernate Core, Hibernate Validator and Ehcache Download.
+- org.hibernate:hibernate-ehcache:jar:3.6.4.Final:compile
+- net.sf.ehcache:ehcache-core:jar:2.4.2:compile
+- org.hibernate:hibernate-validator:jar:4.1.0.Final:compile
|  \- javax.validation:validation-api:jar:1.0.0.GA:compile
Database Driver.
+- postgresql:postgresql:jar:8.3-603.jdbc3:compile
\- hsqldb:hsqldb:jar:1.8.0.7:compile
We need a database driver as well. Find the appropriate JDBC Driver for your database and add it to the project libraries.
I used PostgreSQL. You can get the driver from http://jdbc.postgresql.org/ . You can use the JDBC 3 driver if you are running a current j2sdk like 1.4 and 1.5/5.0.
For MySQL you can use the MySQL connector which can be found at http://www.mysql.com/products/connector/j/
An Oracle database driver is available at Oracle: http://www.oracle.com
A session factory is important for Hibernate. As the name already indicates, it creates Hibernate sessions for you. A session is all you need to access a database using Hibernate. In addition, a session factory initialises your Hibernate configuration.
We need to distinguish Annotation and XML once again. Here comes the Annotation version:
Create a class named InitSessionFactory in the package de.laliluna.hibernate and add the source code below. This class guaranties that there is only once instance (Singleton pattern) and that the initialisation happens only once when the class is loaded.
package de.laliluna.hibernate;

import org.hibernate.SessionFactory;
import org.hibernate.cfg.AnnotationConfiguration;

public class InitSessionFactory {
   /** The single instance of hibernate SessionFactory */
   private static org.hibernate.SessionFactory sessionFactory;
   private InitSessionFactory() {
   }

   static {
      final Configuration cfg = new Configuration();
      cfg.configure("/hibernate.cfg.xml");
      sessionFactory = cfg.buildSessionFactory();
   }
   public static SessionFactory getInstance() {
      return sessionFactory;
   }
}Hibernate uses log4j as logging output. As you can see above we added the log4j library. This library needs a configuration file in the source directory or it welcomes you with the following error.
log4j:WARN No appenders could be found for logger (TestClient).
log4j:WARN Please initialize the log4j system properly.
Create a file named log4j.properties in the root directory. We will configure a simple logging output in the Console.
# configuration is adapted from www.hibernate.org
### direct log messages to stdout ###
log4j.appender.stdout=org.apache.log4j.ConsoleAppender
log4j.appender.stdout.Target=System.out
log4j.appender.stdout.layout=org.apache.log4j.PatternLayout
log4j.appender.stdout.layout.ConversionPattern=%d{ABSOLUTE} %5p %c{1}:%L - %m%n
### set log levels - for more verbose logging change 'info' to 'debug' ###
log4j.rootLogger=debug, stdout
log4j.logger.org.hibernate=info
#log4j.logger.org.hibernate=debug
### log just the SQL
log4j.logger.org.hibernate.SQL=debug
Create a database with MySql or PostgreSQL or anything you like. Call it firsthibernate. This is the same database name, we used in the hibernate.cfg.xml.
We have defined in hibernate.cfg.xml that the tables should be recreated each time when the Hibernate configuration is initialized.
<property name="hibernate.hbm2ddl.auto">create</property>
The setting create will drop and create any tables. It is only suitable during development. You might use update as well. In this case Hibernate tries to update existing tables or create missing tables. This works in most cases but not always. Therefore, I recommend to disable this for production.
We will create a Java class, which will create, update, delete and query our data.
Create a Java Class TestExample in the package de.laliluna.example.
Please look through the source code carefully and try it. I will just give you some general informations before:
- you always need a session to access data
- all access read and write happens within a transaction
- when a transaction fails you should role back your transaction (see the discussion below as well). In this first example, we will skip the exception handling.
In the main method we call other methods creating, updating, deleting and querying data.
package de.laliluna.example;

import java.util.Iterator;
import java.util.List;
import org.apache.log4j.Logger;
import org.hibernate.Criteria;
import org.hibernate.FetchMode;
import org.hibernate.Hibernate;
import org.hibernate.Session;
import org.hibernate.Transaction;
import de.laliluna.hibernate.InitSessionFactory;

public class TestExample {
   private static Logger log = Logger.getLogger(TestExample.class);
   public static void main(String[] args) {
      /* clean tables */
      clean();

      /* simple create example */
      createHoney();

      /* relation example */
      createRelation();

      /* delete example */
      delete();

      /* update example */
      update();

      /* query example */
      query();
   }
The method createHoney creates a new object and saves it in the database by calling session.save.
private static Honey createHoney() {
      Honey forestHoney = new Honey();
      forestHoney.setName("forest honey");
      forestHoney.setTaste("very sweet");

      Session session = InitSessionFactory.openSession();
      Transaction tx = session.beginTransaction();
      session.save(forestHoney);
      tx.commit();
      session.close();
      return forestHoney;
   }
The method update creates a new object using our last method, changes the name and updates the object using session.update.
private static void update() {
      Honey honey = createHoney();
      Session session = InitSessionFactory.openSession();
      Transaction tx = session.beginTransaction();
      honey.setName("Modern style");
      session.update(honey);
      tx.commit();
      session.close();
   }
The method delete creates an object and deletes it by calling session.delete.
private static void delete() {
      Honey honey = createHoney();
      Session session = InitSessionFactory.openSession();
      Transaction tx = session.beginTransaction();
      session.delete(honey);
      tx.commit();
      session.close();
   }
The tables are emptied with the method clean. The method session.createQuery creates a new query and runs it by calling executeUpdate.
   private static void clean() {
      Session session = InitSessionFactory.openSession();
      Transaction tx = session.beginTransaction();
      session.createQuery("delete from Bee").executeUpdate();
      session.createQuery("delete from Honey").executeUpdate();
      tx.commit();
      session.close();
   }
The method createRelation shows, how to create objects and set an association between these objects. This will write a foreign key relation to the database.
private static void createRelation() {
      Session session = InitSessionFactory.openSession();
      Transaction tx = session.beginTransaction();
      Honey honey = new Honey();
      honey.setName("country honey");
      honey.setTaste("Delicious");
      session.save(honey);
      Bee bee = new Bee("Sebastian");
      session.save(bee);

      /* create the relation on both sides */
      bee.setHoney(honey);
      honey.getBees().add(bee);
      tx.commit();
      session.close();
   }
The method query shows how to query all honeys in the database. The call to session.createQuery creates the query and list() runs the query and returns a list of Honey objects.
   private static void query() {
      Session session = InitSessionFactory.openSession();
      Transaction tx = session.beginTransaction();
      List honeys = session.createQuery("select h from Honey as h").list();
      for (Iterator iter = honeys.iterator(); iter.hasNext();) {
         Honey element = (Honey) iter.next();
         log.debug(element);
      }
      tx.commit();
      session.close();
   }
This was a fast example and it is not required to have understood anything.
Lessons learned
- how to create a class, which can be used for mappings (constructor, Serializable, …)
- how to add the mapping
- how to create, update and delete entries
- how to create a simple query
Exception handling was ignored in this example
You should be aware, that in case of an exception, some databases keep resources open, if you do not rollback or commit a transaction. I will speak about transaction handling in detail in chapter Session handling and Transactions Chapter 13, Session and Transaction Handling.
Deployment in Jboss Application-Server
If you try to use the code by a JSP and deploy it to JBoss or deploy any of the later examples to Jboss you might encounter problems. The reason is that Jboss provides already Hibernate libraries and a configuration which conflicts with the Session configuration, I chose for the examples. Either use a servlet engine like Jetty or Tomcat or have a look in chapter Session handling and Transactions Chapter 13, Session and Transaction Handling explaining how to configure Hibernate in JTA environments.
MyEclipse is a plugin provided by Genuitec on http://www.myeclipseide.com/ . I use it for development of all kinds of Web applications including Hibernate, EJB 2 and EJB3. MyEclipse is very up-do-date with the support of current versions of web frameworks, EJB and of course Hibernate.
Create a webproject first and open the context menu of the project (click with right mouse button on the project in the package view). Select add Hibernate capabilities.
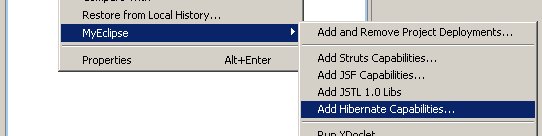 |
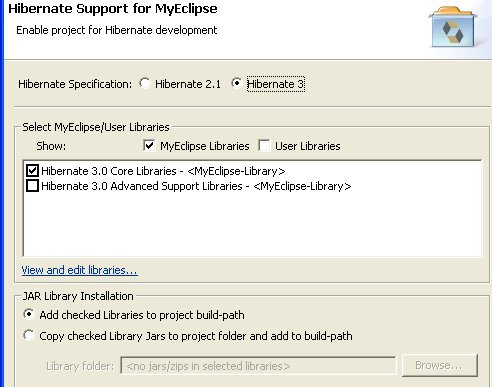
The wizard let you select the Hibernate version and add the needed libraries to your project.
I recommend to add the libraries to the build path and not to copy them to the lib folder of the application. This will allow to set up different configurations for deployment during development and staging.
 |
To stage your finished application you should pack all the libraries with your project. You can configure in the project properties to deploy user libraries like the MyEclipse library in your application server.
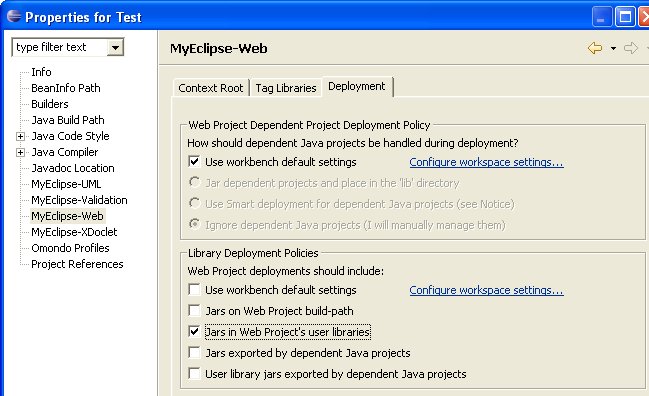 |
During development, I prefer to copy all the Hibernate and Struts libraries to the shared library directory of the application server. I configure the MyEclipse configuration in the project properties to not deploy any user libraries. This makes redeployment very fast.
Lets continue with the wizard. You can select an existing Hibernate configuration file hibernate.cfg.xml or you can create a new one.
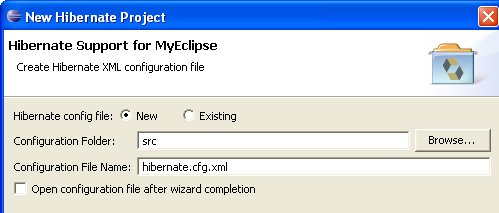 |
Then you can select a database connection profile for a JDBC connection or select a JNDI datasource. A connection profile is the complete configuration of a JDBC database with connection string, user name, password and DB driver.
A connection profile can be used for the database browser as well to see tables, triggers, columns. The database browser allows to generate Hibernate mappings from existing tables as well.
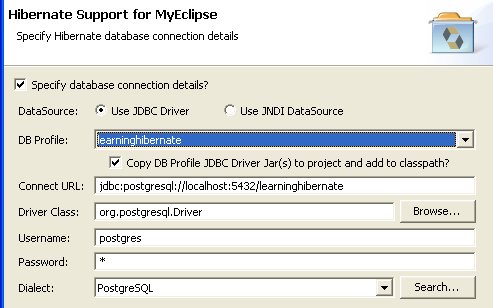 |
Finally you can create a session factory. I prefer to use my own session factory as it is simpler but the MyEclipse session factory works perfectly, as well.
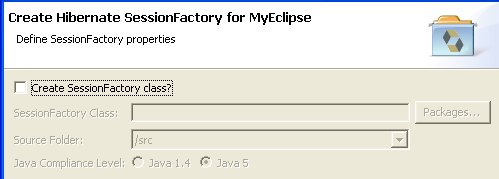 |
Open the View DB Browser (MyEclipse). If you cannot find it open the „Show View“ Dialog and select in the MyEclipse Enterprise Workbench the DB Browser.
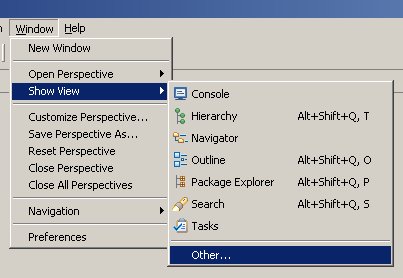 |
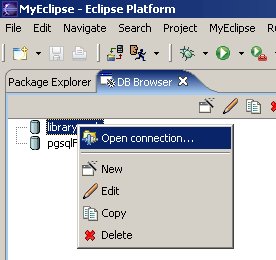
Open the connection profile you specified before.
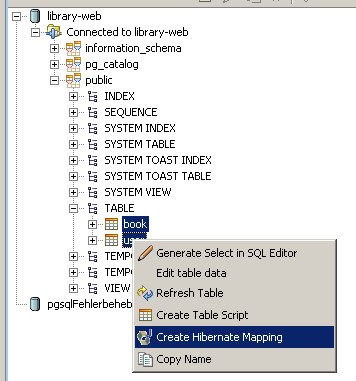
Select the two tables we have just created. Right click and choose Create Hibernate Mapping.
 |
 |
Follow the wizard to select where to create the mapping files and classes. You can even generate DAOs.